Tuesday, July 24, 2012

sweater----->cardigan

i have seen a lot of pins on pinterest about turning a sweater or old shirt into a cardigan. i've even pinned a few. some of them are just pictures and not tutorials. i have had this sweater sitting on a shelf in my room for months. i finally decided to just do it. i am sure others are using fancier methods, but i just did what made sense.
1. lay sweater on cutting board. make sure you only cut through top side of sweater.                                


2. use a ruler and rotary cutter and cut straight down the center of the sweater.                                                                 

3. pin a hem. i did about  1/4". if you really want to be perfectionist, measure the hem so it's perfect.                                             

4. sew the hem. make sure you sew it so the hem is on the inside. i turned my sleeves inside out to help me visualize but it's so not necessary
5. voila you have a cardigan. this really is the same sweater even though the color looks completely different.

i basically wear a cardigan every single day of my life. this was so easy. i'm on the search for more clothes to re-purpose into cardigans

Sunday, July 15, 2012

gluten free peanut butter cookies

dinner with a gluten free friend gave me an excuse to try these gluten free pb cookies. the recipe is here. someone in the comments said to only use 1/2 c sugar and leave out the baking powder so i did. i added coconut to half of them and chocolate chips to a few. i used fresh ground peanut butter so the cookies were a little less sweet than regular peanut butter. i definitely recommend the add ins.

Sunday, July 8, 2012

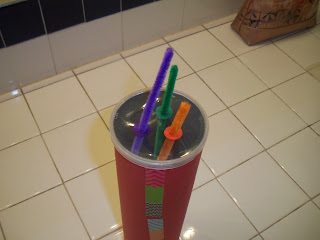
homemade matching toy

I absolutely 100% did not come up with this idea on my own. Brianna told me she saw it on pinterest. I meant to look it up but never did. I just figured out my own easy way of doing it, and it was pretty simple.

disclaimer...this was going to be a really good tutorial. i took step by step pictures with my camera even, BUT the first several saved on the internal memory of my camera. how does that even happen? i don't have one clue where the cord is so i'll try to be descriptive.

supplies
pringles can
hot glue
butcher paper (or some other paper to cover the can)
tape (i used washi tape)
hole puncher
reinforcement labels (ya know...the kind you used in 6th grade when you tore the holes in your papers)
markers
pipe cleaners

steps 1-3  not pictured..so sorry

1. cut paper to cover pringles can
2. cover can completely
3. use a little hot glue (or glue stick if you like that stuff) on the inside paper to glue it to the can and also glue the paper to the paper so it stays in place

4. secure the paper with some tape. i like this fun washi tape found at wal mart of all places


5. punch holes in the lid of the pringles can. i did 3.


6. color reinforcements with marker


7.  put reinforcements around holes in lid


8. match pipe cleaners to the holes


finished product


if you want pipe cleaners to go all the way in the can, trim the tops off. they cut easily with regular scissors


this was so easy to make. i might add a kid's name to the other side of the can to make it more personalized. i can't wait to add this to some kid's church bag or use for home visits for my job.


Saturday, July 7, 2012

IPad Sleeve

Ever since Obama work bought us iPads I've wanted to make a cute sleeve. Bonny posted a couple she made on instagram and I nearly died. We got together for sewing day, and while she sewed baby burp rags, we walked me through the process. It really was pretty easy, and I love the finished product.


we talked about a tutorial half way through, but it was too late by that point. maybe next time.

Wednesday, July 4, 2012

present cake round 2

i didn't really love the way the present on top of the birthday cake turned out. since i had 2 extra presents and plenty of leftover frosting, i decided to give it another go. i still haven't done the fondant yet, but i like this so much better. the contrast of the star tip and regular pipe looks much better and doesn't look like a checker board like the other one. i'm starting to have a little more hope that this pan might work out as cute as i originally thought.

Tuesday, July 3, 2012

Birthday Cake

My friend Allison turned the big 3-0 yesterday and had a party. I bought this pan a while ago and have been dying to use it. A 3 tiered cake with present on top is perfect for a big party right?!? I was terrified the cake wouldn't come out of the pan, but the baking was perfect. Everything was great with the tiers. Unfortunately fav friend Celsey (who I can't even believe I've only known for 8 months) was en route to Lake Powell when the disaster of trying to decorate the present happened. I planned to use fondant but ran out of time and had to resort to the star tip. Attempting that thing alone was a bit ambitious. It worked fine, but there will definitely be more trial runs with the present pan.


could my crappy cell phone pics get any worse? i NEED the iphone 5 to hurry the heck up and come out