Showing posts with label fabric. Show all posts

Friday, March 1, 2013

Sunday, September 30, 2012

clutch revised

i just realized i never posted this and apparently i never blogged when I made this originally with bonny. these clutches turned out a wee bit bigger than i originally thought. i'll probably use it for a baby gift instead. i decided to add a little embellishment. i made a few fabric flowers and stuck 2 rhinestones in the middle. everything's better with a little bling.


Sunday, September 23, 2012

wall art

chelsea usually puts the kids' names on the wall in the nursery. she kind of wanted something a little different for kyler's room but needed something big enough to cover the holes from karson's name. usually i would look around pinterest or blogs or something, but this time i used my very own creative brain. we're from the south so we like monograms. we put kyler's initials on fabric. here's what we did.


1. one giant canvas can get pricey so i bought 3 small canvases at big lots (side note..buy canvas at big lots...it's cheap). jeff attached them together with a staple gun.

2. cover canvas with fabric and staple to the back of canvas with staple gun

3. paint letters with craft paint

4. hot glue letters to canvas

this project was cheap...like less than $20 cheap, and it turned out really cute. it didn't make it to the wall before i left town, but i'll try to get a picture of it hanging on the wall.

Sunday, June 10, 2012

Itty Bitty Baby Skirts

The last time I made these skirts I never got around to posting a link to the tutorial. I searched online and found this tutorial. I actually liked it better than what I did last time. This time I gathered the top by pinning like crazy...more pinning than I have done in any other project. ever, but it worked. Last time I gathered by doing a basting stitch and pulling. I kept breaking the thread. This was was much easier. It definitely helped that these are the itty bittiest things I have ever seen. Someone have a girl baby fast.


Monday, April 16, 2012

Spring Wreaths

whenever i go to chelsea's house lately, the craft of choice seems to be a wreath. we've made
heart wreath for valentine's day
4th of july wreath
i made her a burlap wreath for christmas a couple years ago
we're starting to get a lot of the holidays/seasons covered
this time we wanted a spring wreath
i got on pinterest and started with this as our inspiration


we went with spring colored yarn to start
we used a straw wreath (they're the cheapest) from michaels with a 50% off coupon
the yarn is also from michaels and was on sale
wrap the wreath in yarn. i started measuring to make the stripes but ended up kind of eye balling it. it's not perfect, but it worked out ok
i used the same technique as the heart wreath to make the white flowers. i bought 1/8 yd of white felt and used almost all of it, but now i can see my flowers are much closer together than the above wreath


chelsea did multi-colored flowers. she bought the sheets of felt for $0.33 cents each
she used this tutorial for the spiral flowers


i love that they are both so different but but both so cute
we spent around $6-8 per wreath. definitely better to make than buy.

Friday, March 16, 2012

days 11-15

#monthofhairaccessories

This week has been super warm. Even though this hair challenge is kind of kicking me in the rear, the warm weather kind of makes up for everything else. I've also been wearing green all week since tomorrow is St. Patrick's Day. Apparently I have enough green clothes to last a month. I have a ton more things I haven't even worn.

casey s braid with felt bow

my current fave...high bun with felt flower
fish tail with a little bit of regular braid in the middle with felt bow
remember topsy tails from back in the day??? it's so hard to see, but i did a topsy tail then a bun at the bottom with a silk flower
another high bun with silk twisty flower

Tuesday, March 13, 2012

pendant banner

i made this pendant banner months ago for a going away party and never used and never took a picture. i was in a mega rush when i put it together so i didn't take pictures along the way. it was pretty simple to put together but a little time consuming. due to the set up of the party, we couldn't even use it. i was a little bitter for a while, but i was so excited when it matched the color scheme for nettie's bridal shower. i made it to say congrats or good luck by changing out the letters.

you might think this picture is about the people, but it's actually about the banner above their heads


here's the gist of how i did it

cut triangles out of coordinating fabric
sew a gathering stitch along the top edge of the triangles
gather each triangle separately
pin triangles together 
sew a straight line attaching each triangle to the next
velcro letters to center so they can be changed out for different occasions
hang with tacks

Sunday, March 11, 2012

Not Tonight Pillow

I saw something similar to this pillow online somewhere and unfortunately couldn't find it again. I wish I could credit the place I got the idea, but I seriously can't find it. As soon as Nettie got engaged, I HAD to make it. I think it's so funny.

I took crappy phone pictures of the process. Side not...I just realized my phone pictures are so crappy because my camera lens has a few cracks in it. It might be time for a new phone soon. Until then, here is the crappy picture step by step of the Not Tonight Pillow.


trace stencil (printed from word with a font i liked) onto freezer paper (i got mine from a co-worker but apparently it can be found by the wax paper at the grocery store) shiny side down.
cut out stenciled letters with an exacto knife
iron on stencil to the fabric. make sure it's a good seal so paint doesn't seap through.

paint. a few tutorials used different types of paint and mixed paint types. i used regular acrylic craft paint, and it worked fine. i did 3-4 coats to make sure it was dark/heavy enough to show up

after the paint dries, peel off the stencil.
cover with light material and iron over the words to seal
now it's time to sew. i'm not even going to pretend to know the best way to sew a pillow. these were my first pillows ever, and i'm sure i could use a few tips myself.
finished product

i made 2 pillows because i couldn't decide which one i liked better. the writing doesn't show up quite as well on this one, but i still love it.
co-worker michelle made one out of burlap this week, and it turned out so very cute.

Monday, March 5, 2012

first 5 days

i'm 5 days in with the #monthofhairaccessories. looks like it's a good thing i made all these felt bows. maybe i'll expand my accessories this next 5 days.

regular pony with little felt bow

bigger felt bow on headband

black with little white polka dots bow

i ran out of the house with completely wet hair and was gone all.day.long. i finally threw my hair up in a big knot and put in my Z bobby pin.

messy bun with felt flower.

Tuesday, February 14, 2012

more felt bows

i will never be accused of doing things on a small scale...ever. the felt bows were so cute I HAD to make more. why make a few when i can make many? i swear everyone these days is having boy babies. someone better get having some girl babies pronto.


Monday, February 6, 2012

Felt Bows

Felt bows are all the rage these days. I've been dying to make some. We used this tutorial and used hot glue instead of sewing. They turned out so cute. I'll probably be sporting a few during this month of hair.


Skip Work and Craft

Friday was skip work and craft day. We had a pretty good turn out and made some great projects. Holly crocheted premie hats. Aly made baby Brown some burp clothes. Charity did some mending. Michelle and Kimber made earrings, and Kimber made a skirt and shirt. Brianna, Mikael and I made felt bows, and I made some buttons. I love skip work and craft day!


Sunday, January 29, 2012

Craft Night

Here are the results of craft night #1. I'm kind of dying at how cute these turned out. I haven't had a keychain for years, but I'm pretty excited about this.

We kind of used this tutorial, but I sort of forgot to look at it. We ended up changing it up a little. I love the jewel in the middle.


Sunday, January 22, 2012

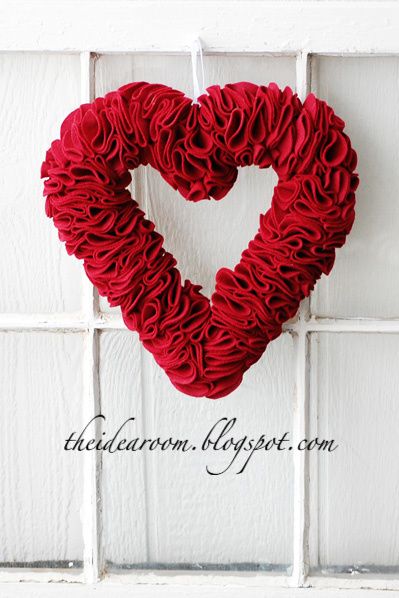
heart wreath

This wreath is all over the internet. I've been dying to make it so I finally did. I love it!
I used the tutorial from the idea room and adapted it a little. 

I didn't think about this until it was too late, but next time I MIGHT wrap it in red yarn or fabric so white doesn't show anywhere. More felt for more circles would be good too, but due to the spending freeze I had to work with what I already had.

Supplies
heart wreath (found at Hobby Lobby)
red felt (i bought 3/4 yard but wish i had a little more)
pins
circle pattern (i used the inside of a roll of masking tape and a wooden circle)
pen for tracing


1. trace circles (I used 2 sizes to give wreath a little more dimension)
2. cut out circles. i used gingher scissors and could cut 4 layers at a time
3. fold circle in half
4. fold in half again
5. pin base of folded circle into wreath
6. i started out super close together..probably too close together
7. cover wreath randomly using big and small circles
8. attach ribbon (i used hot pink) with a pin and hang


these are officially the crappiest cell phone pictures i have ever taken. i really need to stop being so lazy about my picture taking.